Friday, April 29, 2016

Washing a Mattes sheepskin saddle pad in the washing machine

Long before horses entered my life, I had always washed my wool sweaters by hand using the "Woolite in the bathroom sink" method.  Wool is naturally dirt-repellent and typically doesn't need extreme cleaning, so the gentle soak/swish approach was a good way of keeping premature pilling to a minimum.

A dirty sheepskin saddle pad is a different story, however...

Unlike our half pads, these pads sat directly against two hardworking horses jumping over many obstacles.  So they did get very grimy despite the magical powers of the wool.  They definitely needed a thorough cleaning, so they went into the washing machine with care.

First, however, I removed the surface dirt and hair using the mini-turbine attachment on my Dyson vacuum cleaner, just like I do with conventional saddle pads.  Here is the result.  It's hard to tell from the picture, but the wool was very matted down and grimy feeling, even after vacuuming.


Dirty Mattes sheepskin saddle pads
Dirty Mattes sheepskin pads after vacuuming

Next I loaded one pad at a time into the agitator-free washing machine on the gentle setting with less than a capful of Melp.

Once the cycle had completed the pad looked foamy in some places.  I thought that the Melp had not gotten rinsed out completely, but then I noticed that tiny clumps of wool had shed during the washing.  There was not much of this shedding so I removed it by hand and then set the machine on Rinse/Spin only.

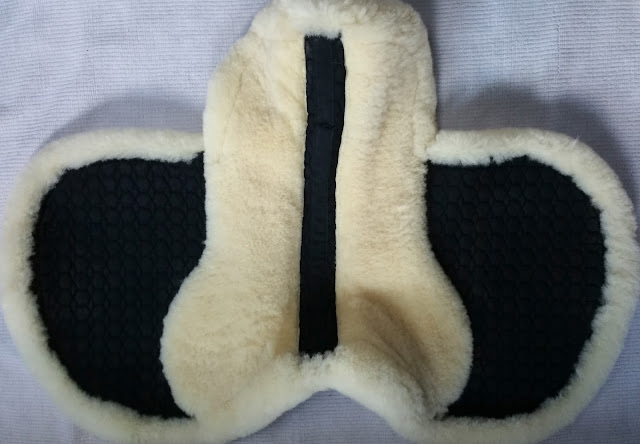
This time the pad looked great, no suds anywhere.  I dried it flat, sheepskin-up, on a drying rack.  Once dry I gently brushed the sheepskin with a slicker brush, and it then looked like this.

Clean and dry Mattes sheepskin saddle pad
Clean and dry sheepskin saddle pad

Close up of fluffy clean and dry Mattes sheepskin saddle pad
Close-up of the fluffy wool.  So touchable!

Now the wool is clean, fluffy, and better able to perform its functions under saddles.

Remember to take care of your sheepskin properly and it will last a long long time!


Sunday, April 17, 2016

The satisfaction of cleaning and conditioning your Dubarry boots

Our family loves our Dubarry boots.  As a horse show mom I can honestly say that my Dubarry country boots have saved my life.  They are simply the most comfortable, warm, and waterproof boots that need no breaking in.  And one appreciates these qualities greatly while trudging around across fields and barn aisles, sometimes in rain and/or mud, for 4+ days of a 3-Day Event.

With our fondness for these boots so established, it may not be surprising that it gives me great satisfaction to clean and condition them periodically.  Do I sound OCD?

On that note, here is an abbreviated recap of our recent Dubarry Spring Cleaning.  Unfortunately I do not have any Before pictures, but you probably didn't want to see those anyway.  They were pretty grim...

As far as cleaning products go, we have so far stuck with the Dubarry line.

Dubarry Cleaning Products

Here are the boots after cleaning and drying for about a day.


Cleaned Dubarry Boots Looking a Bit Dry and Discolored

It was nice to see the boots emerge from under layers of dirt and muck, but they looked dried out and the leather had lost its color in places, especially at the toes.  At this point it's important not to lose hope.  Conditioning will bring them back to life!


Here is the result after using the Conditioning spray and rubbing the smoother leather pieces (the feet and the leather insets on the shafts) with the Leather Cream.

Conditioned Dubarrys
Conditioned Dubarrys.  Much better.


Conditioned Dubarry Boots
Conditioned Dubarrys Ready for Action

Not only does the color look more even, the leather feels so nice and supple now.  These boots are ready to get back out there.  Woo hoo!

Ahh.  So satisfying.


Saturday, April 9, 2016

How to mend holes or tears on a mesh fly sheet


A fly sheet can be a wonderful thing in the summer.  Ours was quite effective while allowing fresh air through its mesh.  We used it for maybe two seasons and it seemed pretty durable.  After washing it, however, I noticed a few holes in the mesh...

holes in a fly sheet
Holes :(

Well, the holes were not that big, and I noticed that the mesh was not fraying wildly (like a knit sweater would), so I tried my hand at mending it the old fashioned way -- with a needle and thread.  When I say "old fashioned", an image like this pops into my mind.

How to darn stockings
by Elizabeth Rosevear, published 1894

I saw something like this when I was around seven years old and the image always stuck in my mind.  It was a section in a book about how to darn socks of all things.  Why I was reading this book I cannot explain (I guess I was bored), but you can at least get the gist of my approach.

Okay, so on to the mending.

First, I wanted extra assurance that the torn edges would not fray further, so I touched them up with Fray Check.  I picked out a strong yet thin synthetic thread that I already had and a basic sewing needle.  Then I began darning, trying to create a neat grid stitches.

tear in fly sheet
Smaller Tear ready to be darned
hole in fly sheet
Larger Hole Fray Checked and ready to be darned


Well, a few stitches into the process I realized that in order to preserve my sanity I was going to have to abandon Elizabeth Rosevear's vision of a neat grid of darning.  In hindsight I probably should have cut the holes into more regular shapes first, but instead I tried to pull the torn edges together as if I was a surgeon stitching up a wound.  Unfortunately for me though, these stitches are not going to dissolve!

Here is the result of my several minutes of labor.

Repaired hole in fly sheet
Larger hole mended
Repaired tear in fly sheet
Smaller tear mended


The hole and tear are closed up, but this was not exactly the look I was going for...  I overdid it with the stitches and pulled a little too tight in some places.  In any case though, I think the fix will hold up.  

So was it worth a few minutes of effort to get more time (maybe a whole season, maybe more?) out of a $150 fly sheet?  When it's fly season, I would say Yes.  Flies are just... YUCK.

Sewed up holes in fly sheet
Not so unsightly in the scheme of a horse-sized sheet, right?
Right???


Saturday, April 2, 2016

Washing a saddle pad at home with less mess

Welcome to the first post of Kerry Equestrian's blog!

While the topics posted here may vary over time, they will initially pertain to the care of horse tack, apparel, and accessories.  We want to share the things we have learned over the years, and we hope to learn from you as well.

Okay, now back to the topic of washing a saddle pad at home.

So after months/years of pushing our teens to do their own laundry, one day I had the horrifying experience of finding the washing machine full of horse hair!  Turns out that my daughter had thrown some saddle pads into our top loading (no agitator) washing machine...  Even though the pad was clean after the washing, it was covered with stray horse hairs, and even the floor underneath the drying rack was sprinkled with stray hairs.

I tried to look on the bright side -- at least the horse hair was clean... ? But I was still horrified and grossed out.

Well, the good news is that we have come up with a saddle pad cleaning protocol that greatly decreases the mess and ick-factor of washing these hard working textiles in our home washing machine.  Here is an example of how we do it now:

1.  Remove hair with vacuum and mini turbine tool.  Previously we had tried to use a dustbuster on the saddle pads, but that barely reduced the volume of hair.  Mainly, this was due to the hair being stuck into the saddle pad.  This is where the mini turbine tool comes in.
The mini turbine tool attaches to our Dyson vacuum.  It spins brushes around and vacuums up a lot of hair and dirt without sucking the pad up too.  So you can run the attachment across the pad by hand and pull up a ton of hair.  Mine is an older model, but this appears to be the current model.

2.  Soak in Oxy Clean to remove stains.  I am a huge fan of Oxy Clean for stain removal.  Just dissolve some Oxy Clean in a tub of water (a large plastic storage tote works well for this) for a few hours.

3.  Wash in washing machine using standard laundry practices.  Now wash the saddle pad with a small amount of powder (we use half the amount we would use for a full load), more oxy clean, and set it for extra soaking.  

If you have a clever auto-sensing machine, be sure to check that it has enough water when it is soaking.  If your saddle pad is new or otherwise on the stiff side, you may want to push down or swish your saddle pad around by hand during the soak cycle.

4.  Air dry the saddle pad on a drying rack.

5.  Clean the washing machine.  If you don't have more saddle pads to wash, you can now clean your machine to your tastes.  Be sure to check the tub and machine for loose hairs.  If you find any, just use a dustbuster to pick them up.  Then you can run the Tub Clean cycle on your washing machine if you wish.  I personally think this is a good idea...

6.  Touch up with vacuum.  Once the saddle pad is dry, check to see if any more hair was dislodged by the washing process, and give it another vacuuming with the upholstery attachment.

7.  Enjoy your clean saddle pad and clean laundry area!

Here are snapshots of the process for one pad:
dirty saddle pad
Saddle Pad Before.  Not too bad, right?

dirty saddle pad lining
Inside of Saddle Pad.  Yuck!
Saddle pad after vacuuming
Inside of saddle pad after vacuuming.  Much less hair, dust, and dirt.
Saddle pad soaking
Soaking

Clean saddle pad lining
Clean Saddle Pad - Inside.  Much better!
Clean saddle pad outside
Clean Saddle Pad - Outside.  Nice.

We hope that you have enjoyed reading about our current Saddle Pad washing best practices.  If you have discovered any best practices yourself, please share in a Comment.

Thanks and Happy Horsing!